Saturday, December 31, 2011

Best of Christmas 2011

This Christmas has been special.  I wouldn't say perfect, but really, really good.  Although this post may not reflect any savvy chic ideas, I wanted to share some of the reasons why this Christmas rocked, in no particular order...

  • Our neighborhood is especially festive, and the feeling is contagious.  Many homes are decorated and go all out.  Some of our neighbors were kind enough to bring by candy, homemade dark chocolate truffles (which didn't last long!), and even toys for the kids.  I am very grateful to be where we are.
  • Having more traffic in the house is great.  Enjoyed a few game nights prior to Christmas and a nice steak lunch on Christmas day.  I love a busy house.
  • Whoo hoo for extra hands around the house!  Can I get an amen?  Here, Derek and Dash cleaned some floors.  Family also helped with the kids.  It was sooo very much needed because.... 
  • It was a handmade Christmas.    It was fun thinking about the gift recipient while working on their present.  We magnetized Scrabble tiles, as seen in a previous post.  These are nutcrackers picked out by Dash at Goodwill for his Nana.  Then, they got a little makeover.  We dry brushed a little brown paint on the small one and distressed him.  The big guy needed help with his mustache.  And, both had small accent berries added in hands and on hats.
  • We can't forget our new puppy love.  We bought her to help entertain the kids and also to give a dog a family.  Since we are home quite a bit, it seemed appropriate to share it with a pet.  Enter: Lady, adopted from Jacksonville Animal Protective services.  She fit the bill of what we needed:  medium size, short hair, and sweet temperament.  She's a great addition!  When your own family wants an addition, please consider a rescue!
  • Our family is extremely fortunate and happy to have Nanny with us.  She suffered a stroke on Dec. 10 and was on a respirator for a couple of weeks.  Many people prayed for her.  Although we were uncertain of the future, when she was taken off the respirator, she strengthened and is still improving.  This was our Christmas miracle!  We love you, Nanny!
  • Every year now for the past three and for hopefully many more, our second greatest joy is sharing tradition with our children.  Ivy recently turned one and doesn't really understand Christmas, obviously.  She's her normal happy self.  That's good enough for me!
Dash, on the other hand, is in full-on-Christmas-on-extreme-caffeine-mode.  Several mornings he woke me up saying, "Mom, you just missed my favorite Christmas song [on the radio]!"  Or, he was fully committed to singing one when I opened his door.  And, I can't forget how he entertained fellow Walmart shoppers with, "Baby, It's Cold Outside."  He gave up one-on-one time with Dad to decorate the tree, which would never happen under normal circumstances.  When Spike, our elf on the shelf, went to meet up with Santa, Dash cried.  Real tears.

The best was when he got his hands on our friend Gina's nativity set.  He held the angel and directed it toward Joseph, and said in an angelic voice, "Don't be afraid.  Mary is going to have a baby.  It's ok.  You can marry her."  What?!  My kid picked up on that much detail in the story?  It was a proud parent moment.  I was only disappointed that it was time to go and didn't get to hear how the rest of his story would have played out.  I got the same mini-nativity later.  I want to be like my friend, Belinda Hatcher, and leave it out all year.  We love Jesus year 'round.
  • The greatest joy of Christmas is celebrating our Savior.  My Pulpit Minister Joel Dalrymple (Jacksonville Beach Church of Christ) says that often people tell him something that touched them about his sermon that he, in fact, did not say.  We just attribute it to a work of the Spirit to convey what we need to hear.  Christmas Sunday (an appropriate day of the week for it to fall on, right?) the sermon was especially meaningful.  I am not certain if I heard what Joel actually said, what I needed to hear, or a combination of both.  Here's what I took away: 
Through years of disappointment in people and even ourselves, sin nature, corrupt politics, news broadcasts, and the like, many have given up on mankind.  Christians, maybe in short-sightedness, only hope for a fairly peaceful life and hope of heaven.  BUT, God thinks highly enough of humanity and his ability to redeem it that He entrusted humans Joseph and Mary for His own care and well being!  Wow. 

I am really not doing this sermon justice by condensing it to that one deep thought, but it is still worth sharing.  Thank you, Joel..  More importantly, God, thank you for believing in people!  What a powerful thought to lead us into a new year.  And, this barely "scratches the surface" of the goodness of God and Jesus.  I look forward to seeing what is in store for 2012.  Happy New Year, y'all!  Blessings!

Thursday, December 22, 2011

Last Minute Gift

The time is almost here...you may be short on time or money, or both.  Here's an easy idea that won't break the bank.  Resourcefulness is close to godliness.  Read on, and see finished project at the end.

You'll need:
baking mix
candy canes or peppermint
an empty container
a Christmas greeting card and a bow

Shhh.....don't tell anyone.  I used regular old BOGO-from-the-store brownie mix.  I took candy canes and rolled a mason jar over to crush them.   After pulling brownies out of the oven (my favorite aromatherapy), I sprinkled them with the mint chips.  I have the notion you could sprinkle peppermint on almost any dessert (except the fruity) for a festive taste.  It would be fun on white or chocolate cupcakes.
Look for containers you have at home.  Even an old butter tub would work just fine, if you wrap the bottom with pretty paper.  I have plenty of baby formula cans like this one.  his can is versatile enough for holding other gifts, too.
I cut brownies and put them in the can.  To decorate the can, I cut the front off a Christmas card and glued it on the can.  Then, I topped the lid with a bow. 
We delivered these to our neighbors and ate a few leftovers.  If I may say so, they were so yummy.  Thanks, Betty Crocker.  Giving and sharing are fun...thank you, Jesus, for the lesson.  Blessings!

Sunday, December 18, 2011

Christmas Craft...to my parents, do NOT read

It's a handmade Christmas here at the Thompson's.  Thought I'd share my most recent project, a decorative cloche for my folks.
Cloche (yes, also the name of popular winter hats) means 'bell' in French.  However, growing up, I'm pretty sure I just thought of it as a container for cheese ball spread at Christmas time.  I bought this one at a thrift store for $1.99 and am kicking myself for passing up another one earlier in the week.  Then, I also purchased a glass candlestick holder from a dollar store, which would soon become a pedestal.
I like to refinish with a good bit of dimension, this time using three shades of acrylic paint.  First, I lightly sanded the base and painted it and the candlestick black, using a foam brush.

After it dried, I used a cotton rag to paint on a coat of light turquoise.  I tried to allow some black to show through.  After that layer dried, I did the same using a tan paint.
When, the color looked the way I wanted and dried, I sanded the edges a bit, even on the candlestick.

Now, I chose to NOT permanently attach the candlestick.  I will include some putty with the gift, that way it can be used at different heights.

You can fill a cloche with many different things:  seashells, Christmas lights, ornaments, balls of yarn (great for knitters), and just about any small objects.  I got this bag, of what looks like sugar-coated fruit, at the thrift store.  I still have leftovers I will use in creating other gifts.

The trick to filling a cloche is to fill it full, and fill it upside down.

  And, there you have it.  You could do the same in even fewer steps.  Maybe you even have a cloche at home that hasn't been getting much use.  It's an inexpensive gift, even if you need to buy one.  I am thinking of how fun it would be to have a collection of cloches!!!  I'd like to give special thanks to the blog that inspired this project, from The Speckeld Dog:  http://thespeckleddog.blogspot.com/2010/12/makeover-gets-makeover.html.  Blessings!

Wednesday, December 14, 2011

Recipe Exchange

My friend Jodi Williams, from Appalachian Country magazine (http://www.acmagazine.org/) is known for yummy recipes.  Here is one she borrowed and loved making with her boys for Christmas Wreath Treats.  As an added touch, Jodi added red licorice bows, which her boys would often swipe.  Boys!  Check out her website, where you can view the entire magazine for free.

Ingredients

  • 1/3 cup butter
  • 1 (10.5 ounce) package large marshmallows
  • 6 cups cornflakes cereal
  • 1 teaspoon green food coloring
  • 1/4 cup cinnamon red hot candies

Directions

  1. Melt margarine in a large pan over low heat. Add marshmallows and stir constantly until marshmallows melt and mixture is syrupy. Remove from heat. Stir in food coloring. Add corn flakes and stir until well coated.
  2. Drop mixture, by 1/4 cupful, onto cookie sheet. Using buttered fingers, quickly shape into individual wreaths. Dot with cinnamon candies
Find it at: http://allrecipes.com/recipe/holiday-wreaths/detail.aspx

Next, several people asked me for the recipe to Ivy's lemon birthday cupcakes (those who ate the cupcakes at church were from the same recipe).  I doubled the recipe, and it made three dozen.  If you click the recipe link, note I skipped the glaze step and instead made icing.
Ingregients
  • 1 (4 ounce) packagejello lemon flavor instant pudding and pie filling or 1 (4 ounce) package vegetarian lemon flavor instant pudding and pie filling

  • 1 (18 ounce) packagelemon cake mix (2 layer size) or 1 (18 ounce) package yellow cake mix (2 layer size)

  • 4 eggs

  • 1 cup water

  • 1/4 cup oil


  • Directions

  • Blend all ingredients in a large mixer bowl; then beat 2 minutes at medium speed.

  • Bake in greased and floured 10-inch bundt or tube pan at 350 degrees for 55 to 60 minutes, or until cake springs back when lightly pressed.

  • Cool in pan 15 minutes; remove from pan.


  • The icing was made from a recipe from a friend who has a future in cake-baking.  Amber Rumancik is a cake decorating genius.  So, I don't want to give away her trade secrets.  Tops of cupcakes (made by me, who is NOT a cake decorating genius) included mini marshmallows and Airhead Xtremes candy.  See my notes from the previous post about these, too.

    Whew, almost couldn't find this one.  It's a blessing and a curse that you can look up a recipe on your phone and scroll as you cook.  Lastly, here is a recipe for Cheddar Rice Casserole.  I promise it's the first time I ever made a casserole from scratch, without condensed soup.  Since my husband doesn't eat potatoes (he must be an alien, right?), we eat and keep lots of rice on hand.  Many of the ingredients you probably already store in your kitchen.  Where it may require a little extra time to cook, it might save you a trip to the store.  I also added in 1/2 diced green pepper, 2 cloves minced garlic, and topped with  1 more cup of cheese instead of breadcrumbs. 
    Cheddar Rice Bake

    Ingredients:

    • 1/2 cup finely chopped onion
    • 3 tablespoons butter or margarine
    • 3 tablespoons flour
    • 1 teaspoon salt
    • 1/8 teaspoon pepper
    • 1/2 teaspoon dry mustard
    • 1/2 teaspoon Worcestershire sauce
    • 2 cups milk
    • 3 cups cooked long-grain rice
    • 8 ounces grated sharp Cheddar cheese, divided
    • 1/2 cup soft fresh breadcrumbs tossed with 2 tablespoons melted butter

    Preparation:

    Cook onion in 3 tablespoons butter until onion is tender; blend in 3 tablespoons flour and salt, pepper, and dry mustard. Gradually add milk, stirring constantly. Continue to cook over low heat, stirring constantly, until mixture is thickened. Add half of the cheese to the sauce mixture; stir until melted.
    Put half of the cooked rice in a lightly buttered 1 1/2-quart to 2-quart baking dish. Layer rice with half of remaining shredded cheese and half of the hot sauce mixture. Repeat layers of rice, shredded cheese and sauce mixture. Top with buttered bread crumbs. Bake at 375° for 25 minutes.  Serves 6 to 8.

    
    Feel free to add your own recipe in the comment box or email one for me to try.  Blessings and Happy Cooking!

    Sunday, December 11, 2011

    Parties on a Budget

    My youngest, Ivy, turned one this past week.  Both times, I have boo-hooed on my kids' first birthdays.  Babies' births were not that long ago, and then they go and have a major milestone.  Who do they think they are?  They have an actual age in years.  It's not right. On the other hand, with the turning of one comes a little relief from infant challenges.  Parent life isn't that much easier, but the dilemmas evolve into at least a new set of problems.

    But, I digress.  This year we were especially budget conscious as day approached.  Here were the guidelines I gave myself for Ivy's party that others may find useful.  And, not just for kids birthdays.

    1.  Be selective in who is invited.  You're not being elitist or "clique-y;" this is motivated by good reasons.  If you want to have a party that includes everyone you know, you're entitled to it.  But, a short list is an easy way to save money.  More guests mean more food and more pressure for extra details (like decorating) to be just right.  I would rather have a small party and the ability for some decor and favors than a large party with no decorations and favors.  Have you noticed when making guest lists, there is a snowball effect?  "If I invite ____, I will also need to invite  ____ and ____."  For Ivy's celebration we invited family.  Easy enough.

    2.  Make the food yourself.  This is a strategy used by moms since the beginning of time, but I almost chickened out.  Cooking for a crowd can be intimidating.  Really the guideline is to make food that is within your abilities.  With the vast number of online recipes, a recipe for you exists.  Please see pics below of my cupcakes.  They were far from perfect, but edible.  They thankfully didn't require great decorating skills.

    3. Use what you already have.  As a frequent kid party attendee, I think this option is overlooked.  Your child's beloved toys could easily serve as a successful party them.  Use them as deco.  I love that some toys like sock monkeys and teddy bears can be staged in many different ways--draped in boas, wearing stickers of a favorite sports team, etc.  Since (for better or worse) Ivy is a December baby, I incorporated mini trees.  I also covered a canvas, which is normally a tulip painting, with party decorations.

    Hope these ideas will help someone else.  Here are some pics that marked the day.  Ivy is so special to me.

    I was inspired by these cupcakes and the fact that Ivy has made our world so colorful and beautiful.  I covered this canvas with a plastic tablecloth.  Next time, I will use a cheap sheet, though.  The paper balloons came from a party store, and her name was written in unrolled cotton ball "clouds."
    I had these small trees on hand, which I believe came from a dollar store.  The table cloth was quite colorful.  With older children, it would be fun to use white paper and crayons for guests to color on.

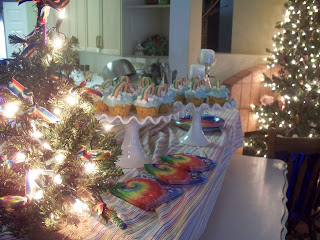
    Our kitchen bar was topped with a brightly striped sheet.  We displayed candle holders (already owned) tied with rainbow ribbon, tie-dye pattern paper plates and napkins, cupcakes on cake stands, favor tree--colorful lollipops tied on with ribbon, pink lemonade and multi-color cups (not shown).  Guests also ate rainbow sherbet. 
    This is my very first time making cupcakes, ok?  Go easy.  The cake and icing were lemon flavored and embellished with marshmallow clouds and rainbows made from Airhead Xtremes.  If I could do this over again, I would let the Airheads get stale.  You read right.  When fresh, they're a bit too pliable.  Some rainbows leaned like the Tower of Pisa.  Most were alright but frustrating to work with.
    Ivy ate not one, but two cupcakes.  As we were posing for a family photo, she decided to share a huge cupcake clump with her brother.  I had to intercept.  You'll notice she's barefoot, which is because I gave in and let her do her own thing on her birthday.  That child never wants to wear shoes.  Florida kid.
    Check out my ruffles.  Thanks, Aunt Wendy.

    One other day of cake at Thanksgiving.  Yes, I like it.

    Thursday, December 8, 2011

    Gifts for Guys You Can Make

    This is where I get stumped every Christmas or male's birthday.  What can I possibly make for a guy (besides food) that he would appreciate?  I went on a web hunt and found Instructables, a DIY site geared toward men's interests.  Here are some fun things you could do.

    First, I found an urban survival kit made from an Altoids tin!  This site also has ideas for other tin kits.
    (sub)urban survival kit
    What guy wouldn't like portable hot sauce?  Find instructions at http://www.instructables.com/id/Ideas-for-Altoids-and-other-tins/.

    Next, a bracelet from paracord!  It could hypothetically be used in a survival situation, and it looks very manly.  http://www.instructables.com/id/Paracord-bracelet-with-a-side-release-buckle/
    Paracord bracelet with a side release buckle

    For manly home sprucing, check out this faux driftwood votive.  http://www.instructables.com/id/Faux-Driftwood-Votive-Tutorial/
    Faux Driftwood Votive {Tutorial}

    Lastly, ignore the fact that this says mother!  This is a fantastic idea (totally doing it here).  Put magnets on the back of Scrabble tiles.  You can play on the fridge or magnetic board.  I have also seen tutorials for covering cookie sheets with paper or fabric, which would make great bases.  So simple and genius!  It comes from Craftster.  http://www.craftster.org/forum/index.php?topic=304285.0

    Happy crafting and blessings!

    Monday, December 5, 2011

    Keepin' It Together

    If you can call repurposing a hobby, it would be one of mine.  I am passionate about it.  My vision for my home is that of chic, reused and repurposed items, spruced up with love.  This is at my core and don't envision that it would change with an enlarged bank account balance.  I believe stuff is just stuff.  You need some stuff to live and some to make life more convenient.  It's all God's.  He allows us, though, some freedom in life to which stuff we have.  My treasures are not laid up in stuff, but while I'm picking, I like old stuff.  Stuff with a past.

    On that note, here is some old stuff and what I've done with it.  First idea was thankfully inspired from Pinterest (you can follow me on Pinterest by clicking the link at right).

    This is a spice-rack-turned-nail-polish holder.  I got it from a thrift store for $2, painted it blue, and sanded the edges.  Now, I am dying to have a couple for my acrylic paints.  Here is the artist who inspired me from Pinterest:  http://www.thespeckleddog.blogspot.com/.

    Here is Spice Rack's new sidekick, Lazy Susan.  She holds those things you can't bear to take off the counter:  lip glosses, lotions, and makeup brushes.  Old votive holders keep q-tips and glosses.  The long-loved basket got a coat of the same paint.  It's so fun to take something with a dark finish and rag on paint in a lighter color.  Help me out if you know the technical name for this.  Here is a link to a Pinterest artist who also loves a lazy susan:  http://www.creativeorganizing.typepad.com/ .
    Here, I had a spare dish drainer and needed somewhere to organize my paper goods.  This project isn't much to look at, but the two married beautifully.  Thrift stores almost always have a couple of these on hand.  I have also heard of dish drainers (probably metal ones) being used to hold children's books.  Sounds neat.

    What are you crafting or organizing?  Blessings!

    Sunday, December 4, 2011

    Friends' Good Hair Day

    Something must be in the water or in the air or people are just taking their vitamins or drinking their V8.  Several church friends had great hair today.  Three in particular so much so that I wouldn't let them get away until I took their pic.  They looked inspired. 

    Here is Steph, who always has good hair.  But, today it had extra oomph!  Love the back.
    This is Heather's inventive braided updo.  Don't worry, her neck didn't get cold.  It's unusually warm here today.

    And this is Amanda (Jordan), who is as beautiful as she is talented.  Her first solo album will soon be released.  Don't forget her name!

    Lovely, just lovely.  Makes me happy to be growing my own locks out.  Blessings!

    Thursday, December 1, 2011

    Coffee Filter Art

    I know I'm biased, but coffee filter art looks even better in person than you see in the pictures.  I need a new camera.  Anyway, coffee filter art is very easy.  It's great to do along-side children.  In fact I learned about it from an occupational therapist in the classroom.  I always love a craft I can do with my children present without worrying about what might get destroyed.  But, children are not necessary to enjoy this project, either.

    To prepare:  I typically buy large frames at the thrift store to paint.  They are hideous and cheap.  You can't beat $6 and a little labor (not sure if I can say "elbow grease" if I'm not cleaning?).  The background paper you choose is important.  I like to use a solid colors so that when the filters are in place, it looks sort of like a graphic print.  In the "Olivia" art below, I just painted over the poster that was originally in the frame.  You'll need:  coffee filters, washable markers, medium size paint brush, double-sided tape, glue, background paper, and frame.

    First, use your frame and filters to decide on a layout and how many filters to design.  Tip:  arrange and take a photo with a phone or digital camera, then repeat and compare layouts.  I eyeball everything.  Maybe one day I'll discover a rule of thumb.  I do know you should make a couple of extra filters, in case some don't turn out the way you'd love.

    Next, use the markers to draw overlapping circular patterns on the filters.  Don't overthink it.  Random is good.  In the art above, I used three shades of blue.  It's just a matter of your palette and preference.  Then, take the paint brush and brush off most of the water back into the cup.  Start with a little water and build as you get more used to it.  Use the damp brush to make dots and swirls through the marker lines.  Lines will blur.  My personal preference is to blur about half of the lines and to use more dots of water than swirls.  Also, brush water on the perimeter of the filter to help it dry flatter.  After they dry, press them under a heavy book for as long as you can stand it.  I'm always itching to complete a project!  Also, remember, the previous detailed instructions are for those who want to know everything before beginning.  Suggestions are meant to be diverted from.  Break the rules.  Do your own thing.

    Now it's time to lay out the designed filters on your background paper.  It's helpful to arrange with help from the double-sided tape.  But, I learned the hard way it alone will not hold filters for long.  The good news is that you can stick and unstick until you're happy.  Then use small dots of glue to permanently adhere filters in place (I used a glue gun).  Finally, place your art in the frame and ENJOY!


    There are so many different ways to mix this up; I can't wait to try more!  For the Olivia filter, I painted it black, wrote in white-out pen, and skipped the water painting.  You could draw different or more random shapes, or cut your filters into other shapes (try cutting them before drawing and after for different effects).  Filters come in a few sizes, so you can experiment with scale.  Try the unbleached ones.  I am also dying to try melting crayon wax drips for an added dimension.
    Here is a filter designed by my son, Dash : )  Maybe I should collect his and frame them.  Hmmm....

    Hope you enjoy playing with this one.  Blessings!
    TWEET TWEET!  Follow me on Twitter:  @jonesythompson